Wednesday, May 17, 2017

End of Senior Year Reflection

Some valuable things I took away from:
Technology: Knowledge in the Mac computer family
Collaboration: i learned the skills needed to collaborate with other E-comm Students to finish a task together
Project Management: i learned how to properly manage workflow in a day to complete a task on time.

My greatest strengths include: Sculpting and creating new and original work.
My weaknesses are: feeling satisfied with a piece i create in maya.

I plan on attending JCCC in the fall and i am enrolled in their animation classes. i am majoring in Animation

I wish i started working in Sculpting a lot sooner than i did
Overall 2017 was a great year i made friends that i hope to continue to see after highschool and beyond, the help from the E-Comm staff made my experience 10x better as well. 

Friday, December 16, 2016

Ecomm End Of Semester 1

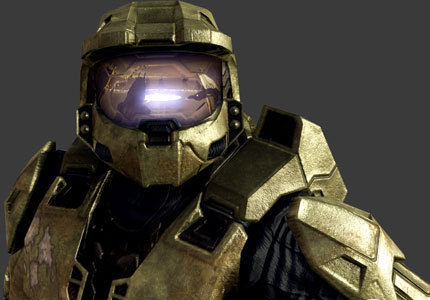
Sculpting a 3D Character in Mudbox


Starting Out:

The start of a 3D model in Mudbox begins with a Sphere or a Cube, for my model I chose to use a sphere and I began by getting a basic shape of the helmet, while getting the shape for the helmet i'm thinking of how I want the helmet to work "Is this a Futuristic helmet or is this set in 2016" I chose futuristic because I like the possibilities of the designs. 

I started by thinking how a futuristic soldier would by fighting and what environments they would be in, the first that came to mind was Space and Chemical Warfare/Radiation. For the armor I wanted it to look like they had finally developed chest rigs and bullet resistant vests that could withstand shrapnel and bullet damage longer then they can today, but also keep in mind that they may be in space also. The front of the Helmet is modeled after a gas mask, I was keeping trying to keep the look that there is a air filtration mechanism just below the red eye glass, hence the 2 oddly shaped lines there. as for the eye glass part I like the look of Halo Spartan Helmets so I kept that look.

After the Helmet was Finished I moved onto painting it, I liked the color scheme of a warm eye glass mixed with a battle hardend dark body color, I also went back to add some highlights with a nice gray color and also colored in some of the shadows because Mudbox lacks a good lighting engine.

The Chest Rig is not specifically modeled after a present day item but I could not help but visualize a medieval looking chest piece, I felt it represented a sense of belonging to a Coalition or Federation - Some Star Wars esk stuff right there. I also added in some logos on the Chest Rig to make it feel as though they belonged to a Country or Group.

Modeling the rest of the body, legs, arms, was a challenge i'm still not comfortable with how it turned out and I plan on going back and changing it because right now it does not fit with the theme I have picked for the character. I think I was too eager to get finished with it and rig it up for an animation.

The Process of Sculpting was time consuming and tedious, Adding volume then smoothing it out, adding more sub divisions then repeating the whole process till i had a high poly model. I think i'm sitting at just over 10 million Polygons right now.

Final Thoughts:

I think for my End of Semester Learning project, it turned out well. I still have plenty of things to learn about sculpting but I plan on continuing to work and develop my skills. Character Modeling and Animation is the route I want to stick to and perfect for the future. 

Till next time.

Aaron Cole
Senior, ONW Highschool


Thursday, May 19, 2016

e-Communication Review 2016


2016 In Review 

This year i improved a lot of my skills in Maya 2016 ranging from basic modeling all the way to rigging, i started a project which i plan on using for an animation where i fully rigged a pair of hands to grip a medieval weapon and animate to chop something in half, another example would be my city scape where i have started giving it color and textures to make it look better.

This semester i switched to watching youtube videos and other guides to help me get better at rigging and texturing which included painting skin weights for rigging and applying bump mapping to texture which i used for my cityscape 

Learning these small skills is important for me because i want to pursue a career in 3-d modeling with the knowledge of other essential skills such as the ones listed above. I'd say y greatest strengths are modeling and attention to detail - which is also the reason why i don't finish projects that often because if its not perfect than i usually hate what i have created and scrap it. id say i have improved in my modeling skills, the cityscape goes to show that as well as the current project i'm working on a tank.

This summer I plan on continuing my unfinished projects and also working on my own projects and getting advice from my teacher as i go through it. if I were to change anything from this year it would be my seating arrangement, I didn't get as much done as I wanted to this year but i'm still satisfied with what i have completed

My 2015-2016 school year was full of great learning experiences and I hope to continue expanding on my skills next year. 

Wednesday, December 16, 2015

Final 2015


Project Semester 1:

The City / AKA Netterville:

The Image above is the final product of a cityscape i have created in Maya 2016, the process of creating the cityscape included: Sketching, basic foreground building models, replica buildings (Seattle, Washington) and scaling to the correct height.

The Buildings:


This is an up close image of one of the buildings i have created, i modeled after a real fire station from Seattle.


Plans:
1. Eventually i plan on turning my city into a basic survival game, i think the city itself has a lot of potential for an idea such as this one because it is a very linear set of blocks and streets making it easier for spawning "Enemy AI"

2. I plan on revising the city later on down the road and touching up the buildings themselves as well as adding color to the buildings, streets.


Reflection:
Starting out on this project by myself was rather difficult because i felt lost 40% of the time. After watching some videos on Lynda.com i was able to get a basic concept idea of how i wanted it to look as well as how to achieve my idea. I everntually got on the road that i wanted to be on and began building my city piece by piece, as i was getting to the halfway point in building my city i was approached by a fellow classmate (Anthony) and he was able to pitch into my idea and help me speed up the process of making a city. the process of finding buildings wasn't difficult i just went into google maps and found i street i liked and began modeling that building.

More Screenshots and Videos:


Thursday, September 10, 2015

Fish

How to make a fish in Maya:

1. To start out by making your fish, draw an outline of the fish you have in mind on paper. 

2. Once you get an outline your comfortable with, upload it on your PC or Mac

3.  Once its uploaded throw it into maya and use it as a reference for making your model.

4. Start by using a square as a base model - Switching to a view where you can see your reference - Move the vertex's to to the basic outline of the fish.

5. After the basic outline is complete create a Smooth Mesh Poly - Go to Modify - Convert - Smooth Mesh Poly

6. Now its time for a texture to put on your fish - Create a texture using Photoshop - Move the texture into maya and apply it to your fish - make sure it fits.

7. Time to set up bones - in the top Left switch to the Rigging Category - Now use bones and set them at each limb or fin 

8. After the rigging is finished its time to attach it to the skin - Select the Skeleton and body - go to Skin - attach skeleton

Wednesday, May 20, 2015

My Movie


For my final project we were tasked with making a short animation, we came up with the idea of a UFO abducting Josh, Sierra made the UFO while the rest of us waited to shoot our footage using the green screen, shooting our footage took the longest because everyone else beat us to the green screen before us, it took 3 days before we were able to use the cameras.

Wednesday, May 13, 2015

Template

This is my template design for the product i made: Speedable - The Energy drink that makes you run 10x faster than any other drink out there, the template design itself was the hardest thing to do